Calibration
This guide will help you calibrate your Crimpdeq device to ensure accurate weight measurements. The calibration process involves using a known weight to establish a reference point for the device’s measurements.
Prerequisites
- nRF Connect installed for your platform:
- A stable mounting point so the device hangs freely and remains still
- One known weight (ideally near your typical maximum load)
Calibration Steps
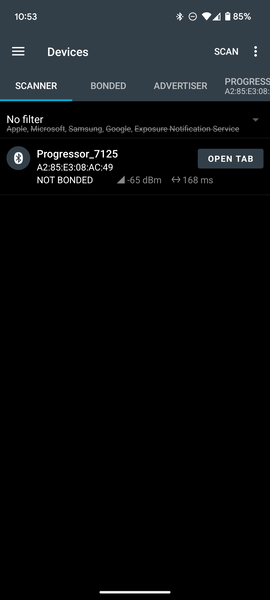
- Connect to Crimpdeq with nRF Connect:
- Launch the app and go to the Scanner tab.
- Find the device named “Progressor_7125” and tap “Connect”.
- Once connected, the app will display the device’s services and characteristics.
- Locate the calibration characteristic:
- Expand the “Unknown Service” section.
- Find the characteristic with UUID:
7e4e1703-1ea6-40c9-9dcc-13d34ffead57.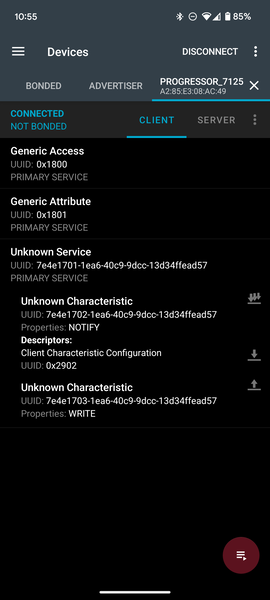
- Compute the hex value of your known weight:
- Open the Floating Point to Hex Converter.
- Select “Single-precision” (32-bit) floating point.
- Enter your known weight in the “Float value” field (in kilograms unless your device expects grams; see Important Notes).
- Click “Convert to hex” and save the resulting “Hex value”.
Example: 75.3 kg →0x4296999a.
- Zero the device (tare):
- Hang Crimpdeq with no weight attached.
- Send the command
7300000000to the characteristic:- Tap the Up Arrow icon on the characteristic (
7e4e1703-1ea6-40c9-9dcc-13d34ffead57). - Enter the command as shown.
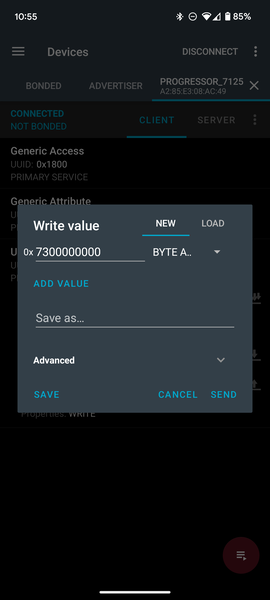
- Tap the Up Arrow icon on the characteristic (
- Perform the calibration:
- Commands and values are hex strings without spaces (letter case does not matter).
- Attach your known weight to Crimpdeq.
- Build the calibration command by prefixing
73to your hex value.- Example: For 75.3 kg (
0x4296999a), send:734296999a.
- Example: For 75.3 kg (
- Send this command to the same characteristic (
7e4e1703-1ea6-40c9-9dcc-13d34ffead57).
- Verify:
- Remove the weight and reattach it.
- The reported value should be within a small tolerance of the known weight. If not, repeat steps 4–5.
Important Notes
- Units: Some devices expect the calibration value in grams instead of kilograms. If, after calibration, the measured value looks off by a factor of ~100 (e.g., 75.3 kg shows ~0.75), convert your known weight to grams and repeat step 5.
- Use a weight close to the maximum load you expect to measure (while staying within device limits) for best accuracy.
- Ensure the device is stable and stationary when sending commands.
- Perform calibration in a controlled environment (avoid wind, vibration, and temperature swings).